Do you want to take your creative projects to the next level? Learning the basics of inking can help transform your work—whether you’re crafting greeting cards, designing scrapbook pages, or exploring digital illustrations. Mastering ink techniques isn’t just for professional artists. It’s for anyone who wants to add style, depth, and personality to their creations.
This guide will cover the fundamental principles of inking, from choosing the right tools to using essential techniques that will make your projects pop. Whether you’re a beginner or a seasoned crafter, you’ll learn everything you need to start creating beautiful inked designs.
Why Learn the Basics of Inking?
Before we jump into the practical steps, let’s talk about why inking is a game-changer for your creative projects.
- Adds Depth and Dimension: The right inking techniques can create shadows, highlight focal points, and give your art a polished, professional look.
- Versatility Across Projects: From illustrations to homemade cards, inking methods can be adapted for any medium, whether you’re sketching, stamping, or lettering.
- Precision and Style: Beginners often find that mastering lines, details, and textures takes their projects from flat and dull to eye-catching and dynamic.
With inking, the possibilities are endless. Now, let’s jump into the essentials.
Choosing the Right Tools for Stunning Results
Starting your inking adventure is all about having the right tools in your arsenal. Here’s a breakdown of the must-haves:
1. Pens and Markers
The pen or marker you use can make a huge difference in your results. Each type is suited to different styles:
- Micron Pens are fantastic for detailed line work.
- Brush Pens allow for elegant strokes and lettering.
- Gel Pens are a fun way to add bold colors or metallic accents.
2. Ink Pads
Traditional inking projects often require ink pads, especially if you’re incorporating stamps. Look for archival-quality ink that won’t smudge and works well on different paper types.
3. Paper
Not all papers are created equal. When working with ink, use smooth, heavyweight paper to prevent bleeding. For mixed-media projects, you may prefer textured or watercolor paper.
4. Stamping and Embossing Tools
Stamping tools add intricate designs to cards or scrapbooks, but if you want to go one step further, consider investing in an embossing machine. The raised patterns give your project a tactile, professional-quality finish.
By assembling these essential tools, you’ll be ready to explore inking with confidence.
Essential Techniques to Master Crafting with Ink
With tools in hand, it’s time to practice the techniques that make inking an art form. Here are some essential skills to help turn your creative projects into masterpieces:
Line Work
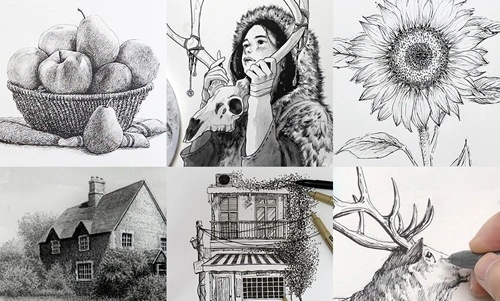
Line work is the foundation of inking. Practice controlling the thickness and direction of your lines for more depth.
- Thin Lines add delicate details, like fine textures or subtle outlines.
- Thick Lines create bold borders, shadows, or fills, creating a dynamic contrast.
Cross-Hatching
This technique involves crisscrossing parallel lines to create shadow and texture. Use cross-hatching sparingly for subtle shading or layer it for richer effects.
Stippling
Add texture with stippling by creating patterns with small ink dots. This method is ideal for fine art or adding softness to illustrations.
Blending
For those working with brush pens or markers, blending shades can create a gradient effect. Lightly layer colors and use a blending pen or smooth strokes for a seamless transition.
Stamping and Embossing
Combine stamps with an embossing machine to add unique designs or elevate the textures of your project. Embossing ink pads and powders can create stunning, raised finishes.
Tip: Play with these techniques to find a style that aligns with your creative vision. It’s okay to experiment—inking is all about seeing what works for you.
Mistakes to Avoid as a Beginner
While inking can be easy to pick up, mastering the craft requires avoiding some common pitfalls:
- Rushing the Process: Quality inking takes patience. Always allow layers to dry before adding new ones to avoid smudging.
- Using the Wrong Tools: Your tools are everything. A poor-quality pen or the wrong type of paper can ruin a project.
- Skipping Practice: Like any skill, inking requires practice. Use a sketchbook or scrap paper to experiment before applying techniques to your final work.
Keep these in mind, and you’ll save yourself some frustration!
Leveraging Digital Tools for Modern Creative Projects
While traditional inking methods are timeless, digital inking tools are becoming popular for artists and small business owners alike.
Tools like Procreate or Adobe Illustrator allow you to experiment with different inking effects without the fear of making irreversible mistakes. Plus, digital flexibility opens up new doors for licensing or printing your designs later.
Digital or traditional, blending these two worlds can lead to designs that feel modern yet authentic.
Build Your Creative Community
One often-overlooked element of creative projects is the power of community. Other creators can offer feedback, share resources, and inspire new ideas. Join groups or forums focused on crafting or inking—it’s a great way to stay motivated and keep learning.
Follow popular hashtags like #inkingprojects or #creativecrafts on platforms like Instagram to connect and share your work with like-minded individuals.
Whether you’re crafting cards or creating prints to sell, surrounding yourself with a supportive community can make the experience even more rewarding.
Unleash Your Inner Artist with Stunning Ink Projects
Mastering inking basics offers a pathway to endless creative possibilities. By choosing the right tools and practicing a few core techniques, you’ll create projects that wow both you and your audience.
Start small—try your hand at line work, explore blending, or experiment with using an embossing machine for textural flair. Over time, you’ll gain the confidence to create stunning, professional-quality works.


